Nicot Queen Rearing
JZBZ Cell Cups
One of the most popular queen rearing tools are the jzbz queen cell cups. It appears to be almost an industry standard for many beekeepers and there is a good reason. They are cheap, easy to clean and can be reused many times. You can place up to 4 bars each having 15 cups on a frame for a total of 60 queen cells per frame.
Why we use Nicot
One of the problems we have with the jzbz is a lack of a complete integrated system for caging, protecting and storing the ripe queen cells. The system that we have come to love is the Nicot Queen System. We only raise about 30 queen cells per round and that’s a good number because it ensures all the larvae are fed properly in development.
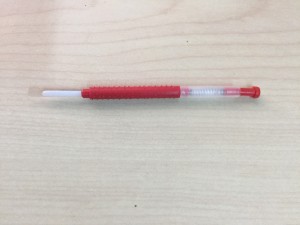
The best tool, in our opinion for grafting is the Chinese Grafting Tool. They range from $2.00 – $6.00 depending on the source. More information is given on how to use this tool on our grafting queens page.
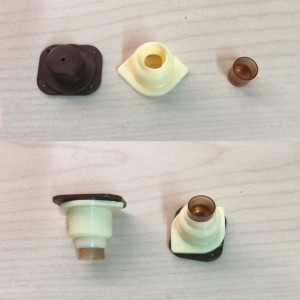
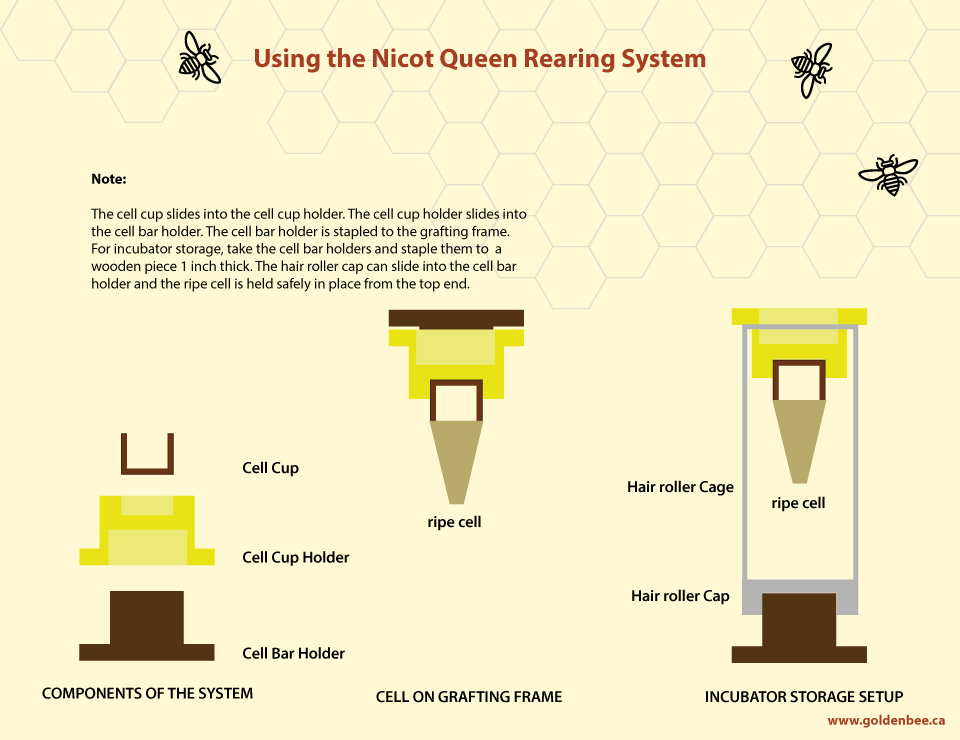
Here are the components in the Nicot System:
- Cell bar holder: These are the pieces that you can nail, glue or staple to your grafting frame.
- Cell cup holder: The cream colored piece where the cell cups get pushed into. The cell cup holder gets pushed on the cell bar holder. See third item.
- Cell cups: These are the cups that fit into the holder as illustrated in the picture. They are cheap enough and not worth cleaning time so we do not reuse them. (Canadian sources are much more expensive.)
- Grafting frame: You will need a grafting frame and staple your cell bar holders (the dark brown pieces) to the frame bar. You can purchase a frame, but they are expensive. They are easy to make if you have any woodworking experience. I suggest making your own. You can fit 13 – 15 cell bar holders to a grafting frame bar and they can either be stapled or hot glued. The cell cup holder slides into the cell bar holder and then cell cup slides into the cell cup holder as illustrated in the picture.
- Many beekeepers use up to 4 cell bars on a frame. For reasons discussed in number 5, we only have two rows
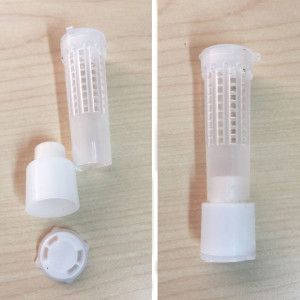
Left picture shows hair roller, queen candy and cap. Right picture shows the assembled introduction cage. for grafting. Depending on your spacing, you can graft up to 30 queens per run. I feel that is enough if you want good quality queens.
- The Hair Roller Cage: This is the cage that can be used for introduction, protecting cells or simply keeping cells upright in the incubator. This cage easily slides on the cell cup holder on the frame and will protect queens inside.
- Nicot Candy Cup and Closure: This piece is not very popular and is hard to find but I wouldn’t want to be without them. It is a queen candy holder (for introduction) and an cap. I love the ingenuity of this piece because I can keep the queen candy off limits from bees outside the cage for 2 days and then open it. Sometimes queen candy is a bit soft and aggressive bees will chew through it in a day – much too quick. The cap is the perfect solution. Keep the cap on the candy cap for two days and then simply remove the cap and bees will chew through the candy releasing the queen. This gives you a little more control over the timed release. Or you can simply release her after 3 days and know the queen was well fed during this time. Either way, I don’t know why this piece isn’t available as readily as the other pieces in the Nicot system.
-

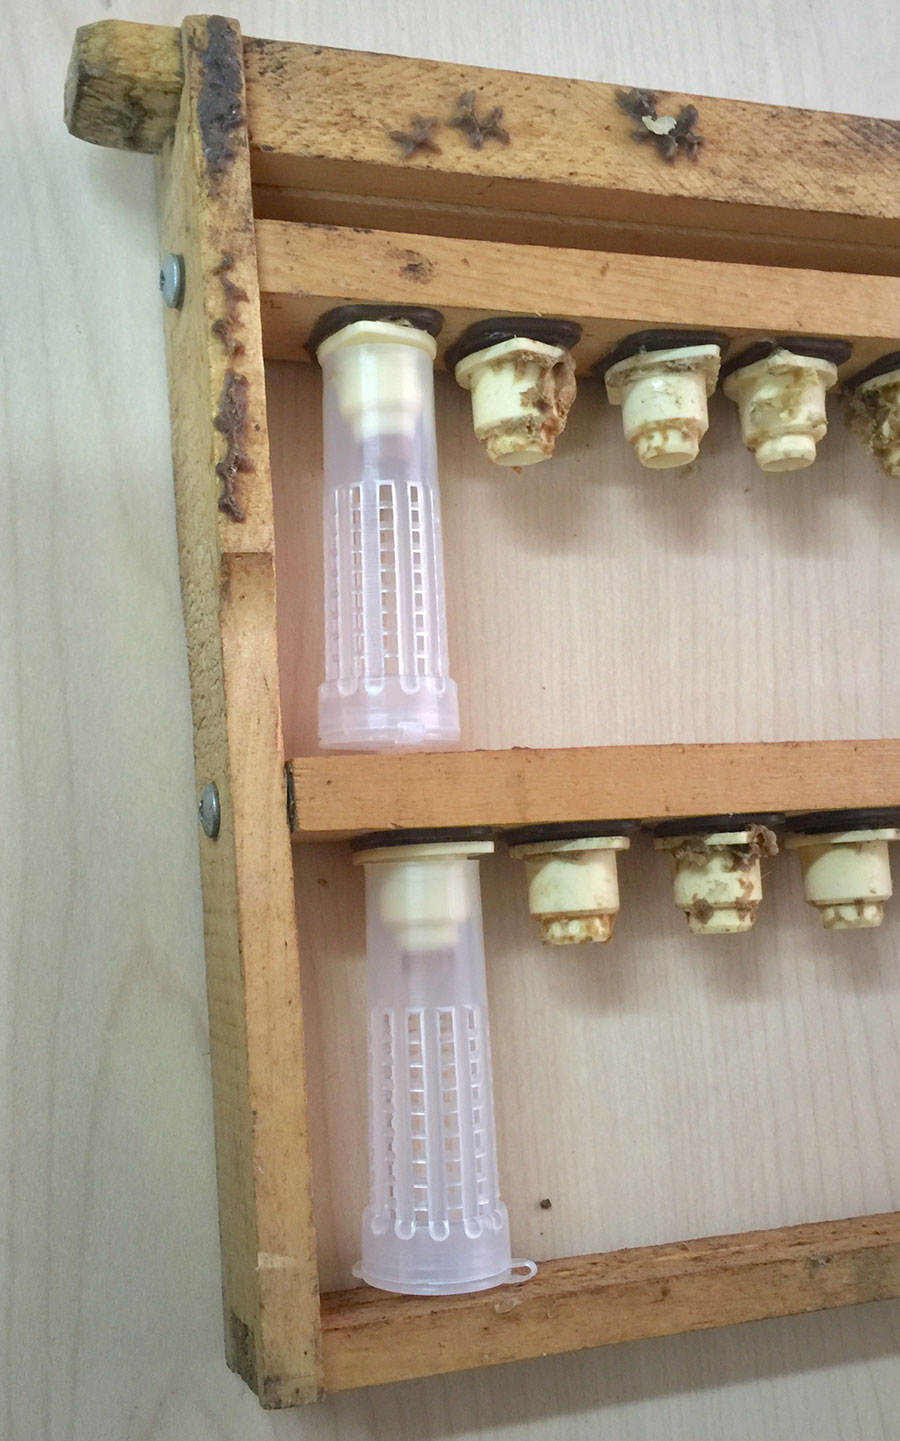
The grafting frame showing how cages are used if you want to protect ripe queen cells. The Grafting Frame: The frame that your place your grafting bar on. Mine have 2 bars and they are vertically spaced so that hair roller cages can be placed on ripe queen cells. This is a great option if you do not have an incubator. Use a screw on the end so they can easily swivel so the cages can be added. In the event that a queen hatches earlier than you expect, you don’t have to worry about a her killing off all the sister queens in the other cells.
From what you can see, it’s easy to see why this system is become a quick favorite. From the grafting stages to the introduction and everything in between, all the pieces fit together into a seamless process.
Using an Incubator
If you are using an incubator, you can staple the dark brown cell bar holders to a piece of wood and then use it as a stand for your cages. The caps on the hair rollers have a notch and it’s the same diameter as the as the cell holder bars. That’s right, the cap can fit on the cell holder bar. Your cell bar holders will face upright (they face down on a grafting frame) and the cap on the bottom of the cage will fit perfectly. This keeps your cages upright and your cells safe from falling over. If a queen hatches, she will be safe inside the cage.
To introduce, simply remove the cup, and cream colored cup holder, and add in the Nicot Candy Cup and Closure (item #7 above) and you’re ready for introduction. We usually live release queens if we have them in the cage, but most times, we add them to a nuc 24 hours before hatching date.
The diagram below illustrates how we use the system in the incubator.
Note: If you plan on using the nicot system and want to use an incubator, be sure to order extra cell bar holders. Usually you get the same amount of each component of the system. Since you staple some to the frame, you may not have enough for the incubator.
What a well thought out system!
May 17, 2018 @ 3:28 am
Hello, thank you for sharing the info on nicot. I’m debating getting this system, as I can’t find the official site and there are lots of ripoff brands. Can you suggest a resources for me? I’m in Canada.
Thank you,
Liana
June 30, 2018 @ 11:19 am
Most beekeeping stores have it available. If not, check out beemaid, countryfields, brushy mountain, kelly beekeeping… they all carry them I belive.
April 15, 2020 @ 2:17 pm
hello!
Thanks for talking about some of the components, but could you give us any description on how to actually use the nicot system (timeline, prepping, location on frames, etc.)? Planning on using it this spring… Thanks in advance!
Joe
April 18, 2020 @ 8:05 pm
Thanks a lot for sharing info on the Nicot system. Helped me choosing a queen rearing system. I just purchased it at Propolis in Quebec. For more information the link to Nicot is below, unfortunately in French but google translate can help:
http://www.nicotplast.fr/apifrancais/elevage/elevage-cne125789-cupule.htm
I read carefully how you use the system and found it makes a lot of sense. I must say this is the best source of information I found on Nicot system. It is clearer than Nicot’s web site.
Only one thing is still puzzling me… I also purchased what you call the Candy cup and closure. from Nicot’s web site i translate it as ”plug for natural cell”. They describe it like a container for natural queen cell that you want to transfer in an incubator…??? not so sure about how to achieve this…
Something else, on Nicot’s web site, they say the cell cup holder is used as candy cup holder along with plug B1 (which was not sold by Propolis, so I do not have it yet). I guess I will also use the ”plug for natural cell” as candy cup holder just like you do.
Thanks again
Joel
April 18, 2020 @ 9:53 pm
What you are describing sounds like the cap in the photo above next to number 5. I use those for queen introduction and they go into the end where the cell cup holder would normally go.
Once I have a queen to introduce to the hive or nuc, I fill that plug with queen candy and put it into the end of the cage. This seals off that end. You then have a choice to add an additional cap (also pictured) to the bottom and manually release the queen after 3 days. This will ensure that you get the proper amount of time for an introduction. This is what I do most of the time. Note I only use these for queen introduction, they do not have any other purpose in queen rearing.
July 5, 2020 @ 3:18 am
Hi
How do you clean the nicot system up? Particularly the brown cups? Thanks
August 28, 2020 @ 4:39 pm
We don’t reuse these, but I believe you can put them in hot water.
Queen Cell Bar Systems: Attaching and Managing Multiple Cells – beekeepingmadeeasy.com
November 27, 2025 @ 10:37 am
[…] attaching cell bar holders to grafting frames, you can use nails, glue, or staples—attachment methods that ensure stability while allowing for necessary access during the rearing […]